
Last Updated on January 21, 2026
In the world of house painting, the prep work is often overlooked, but it is absolutely essential for achieving a flawless and long-lasting finish: Painting and the importance of primer. One of the most crucial steps in the prep process is applying primer. Primer acts as a base coat, creating a smooth and uniform surface for the paint to adhere to. It helps to seal any imperfections, such as cracks or holes in the walls, and ensures that the paint goes on smoothly and evenly.
But primer is not just for hiding flaws. It also enhances the color and durability of the paint, helping it to last longer and look better over time. By providing a barrier between the paint and the surface, primer helps to prevent peeling, cracking, and fading, ensuring that your paint job stays looking fresh for years to come.
Whether you’re painting a single room or your entire home, don’t skip the primer. It may seem like an extra step, but it’s well worth the effort and it helps with color harmony. Invest in a high-quality primer and take the time to apply it properly, and you’ll be rewarded with a professional-looking finish that will stand the test of time.

Why is primer important in house painting?
Primer is an essential step in house painting for several reasons. First and foremost, it helps to create a smooth and even surface for the paint to adhere to. Without primer, paint can be absorbed unevenly by the surface, resulting in blotchy and inconsistent coverage. Primer acts as a sealant, filling in any cracks, holes, or imperfections on the surface, ensuring that the paint goes on smoothly and evenly.
Painting and the Importance of Primer
In addition to creating a smooth surface, primer also enhances the color and durability of the paint. It acts as a barrier between the paint and the surface, preventing the paint from being absorbed too quickly. This allows the paint to maintain its true color and prevents it from fading over time. Primer also helps to prevent peeling and cracking, ensuring that your paint job stays looking fresh and beautiful for years to come.
Benefits of using primer in house painting
Using primer in house painting offers several benefits that make it an essential step in the process. Firstly, primer helps to improve the adhesion of the paint to the surface. It creates a strong bond between the paint and the surface, ensuring that the paint doesn’t chip, peel, or crack easily. This is especially important for surfaces that have been previously painted or are made of materials such as wood or metal.
Secondly, primer helps to seal any imperfections on the surface, such as cracks, holes, or rough patches. It acts as a filler, smoothing out the surface and creating a more uniform canvas for the paint. This not only improves the appearance of the paint job but also helps to prevent further damage to the surface.
Another benefit of using primer is that it can help to save you time and money in the long run. By providing a barrier between the paint and the surface, primer helps to prevent the paint from being absorbed too quickly. This means that you’ll need fewer coats of paint to achieve the desired coverage, saving you both time and money. Primer also helps to extend the life of your paint job, reducing the need for frequent touch-ups or repainting.

Different types of primer for different surfaces
Not all primers are created equal, and choosing the right primer for your project is crucial for achieving the best results. There are different types of primer available, each designed to work best on specific surfaces. Here are some common types of primer and the surfaces they are best suited for:
- Drywall Primer: This type of primer is specifically formulated for new drywall surfaces. It helps to seal the porous surface of drywall, ensuring that the paint adheres evenly and prevents excessive absorption of the paint.
- Wood Primer: Wood primer is designed for use on bare wood surfaces, such as doors, trim, or furniture. It helps to seal the wood and prevent it from absorbing moisture from the paint, which can cause the wood to warp or decay over time.
- Metal Primer: Metal primer is specially formulated to adhere to metal surfaces, providing a protective barrier against rust and corrosion. It helps to improve the adhesion of the paint and ensures that it withstands the test of time.
- Masonry Primer: Masonry primer is ideal for surfaces such as concrete, brick, or stucco. As it is pH balanced, it helps to seal the porous surface and provides a strong base for the paint to adhere to, preventing peeling or cracking.
- Stain-Blocking Primer: If you’re painting over a surface with stains, such as water stains or nicotine stains, a stain-blocking primer is essential. It helps to seal the stains and prevents them from bleeding through the paint, ensuring a clean and even finish.
When choosing a primer, make sure to read the label and select one that is specifically designed for the surface you are painting. Using the right primer will ensure that the paint adheres properly and provides the best possible results.
How to choose the right primer for your project
Choosing the right primer for your project can seem overwhelming with the wide variety of options available. However, by considering a few key factors, you can make an informed decision and select the primer that will work best for your specific needs.
The first factor to consider is the surface you will be painting. As mentioned earlier, different surfaces require different types of primer. Determine whether you will be painting drywall, wood, metal, or masonry, and select a primer that is specifically formulated for that surface.
Another important consideration is the type of paint you will be using. Some primers are designed to work best with oil-based paints, while others are better suited for latex or water-based paints. Check the label of the primer to ensure compatibility with the type of paint you plan to use.
Additionally, consider any specific challenges or requirements of your project. If you are painting over stains, for example, you will need a stain-blocking primer. If you are painting in a high-humidity area, you may want to choose a primer that offers moisture resistance. By considering these factors, you can narrow down your options and choose a primer that will meet your specific needs.
Lastly, always opt for a high-quality primer. While it may be tempting to choose a cheaper option, investing in a high-quality primer will pay off in the long run. High-quality primers offer better adhesion, coverage, and durability, ensuring that your paint job looks great and lasts for years to come.
Preparing the surface before applying primer
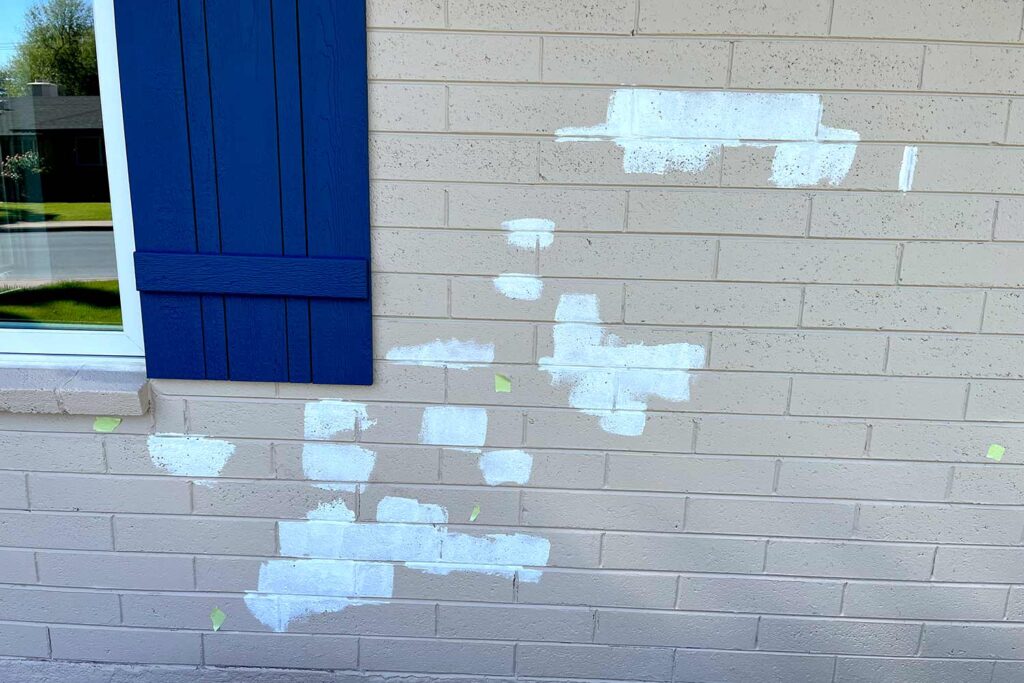
Before applying primer, it is essential to prepare the surface properly to ensure optimal results. Here are some steps to follow when preparing the surface:
- Clean the surface: Remove any dirt, dust, or grease from the surface using a mild detergent and warm water. Scrub the surface gently with a sponge or brush, and rinse thoroughly. Allow the surface to dry completely before proceeding.
- Repair any imperfections: Fill in any cracks, holes, or dents on the surface using an appropriate filler or spackle. Smooth out the filler with a putty knife and allow it to dry completely. Sand the repaired areas lightly to create a smooth surface.
- Remove loose paint: If there are any areas with loose or peeling paint, scrape it off carefully using a paint scraper or putty knife. Sand the edges of the remaining paint to create a smooth transition between the old and new paint.
- Sand the surface: If the surface is smooth but has a glossy or slick finish, sand it lightly to create a rougher surface that will help the primer adhere better. Use fine-grit sandpaper and sand in a circular motion until the surface feels slightly rough.
- Dust off the surface: After sanding, use a clean cloth or tack cloth to remove any sanding dust from the surface. Wipe the surface gently, ensuring that all dust particles are removed.
Once the surface is properly prepared, you can proceed to apply the primer. Proper surface preparation is crucial for achieving a smooth and durable paint job, so take the time to complete these steps before moving forward.
Tips for applying primer effectively
Applying primer properly is just as important as choosing the right primer. Here are some tips to help you achieve the best results when applying primer:
- Clean and prepare the surface: Before applying primer, make sure the surface is clean and free from dust, dirt, and grease. Use a mild detergent and warm water to clean the surface, and allow it to dry completely before proceeding. If there is black mold present, simply wash with a bleach and water solution.
- Sand rough surfaces: If the surface is rough or has any imperfections, sand it lightly to create a smooth and even surface. This will help the primer adhere better and ensure a more professional finish.
- Use the right tools: Use a high-quality brush or roller that is appropriate for the type of primer you are using. A brush is ideal for smaller areas or detailed work, while a roller is more efficient for larger surfaces. Follow the manufacturer’s instructions for the recommended tools to use.
- Apply in thin, even coats: Apply the primer in thin, even coats to achieve the best coverage and adhesion. Avoid applying the primer too thickly, as this can lead to drips or uneven drying.
- Allow proper drying time: Follow the manufacturer’s instructions for the recommended drying time between coats and before applying paint. Rushing the drying process can result in poor adhesion and a less durable finish.
- Clean up properly: After applying primer, clean your brushes or rollers thoroughly with water or the recommended cleaning solution. Properly cleaning your tools will help prolong their lifespan and ensure better results in future projects.
By following these tips, you can ensure that your primer is applied effectively, providing a solid foundation for your paint job.
Common mistakes to avoid when using primer
While primer is a crucial step in the house painting process, there are some common mistakes that people make when using primer. Avoiding these mistakes can help you achieve the best results and ensure a professional-looking finish. Here are some common mistakes to avoid:
- Skipping surface preparation: Skipping or rushing the surface preparation can lead to poor adhesion and a less durable finish. Take the time to clean, repair, and sand the surface properly before applying primer.
- Using the wrong type of primer: Using a primer that is not suitable for the surface or paint type can result in poor adhesion and inconsistent coverage. Always choose a primer that is specifically formulated for the surface you are painting and compatible with the type of paint you plan to use.
- Applying too thickly: Applying primer too thickly can lead to drips, uneven drying, and poor adhesion. Follow the manufacturer’s instructions for the recommended thickness and apply the primer in thin, even coats.
- Not allowing proper drying time: Rushing the drying time between coats or before applying paint can result in poor adhesion and a less durable finish. Follow the manufacturer’s instructions for the recommended drying time and allow the primer to dry completely before applying additional coats of paint.
- Not cleaning tools properly: Failing to clean your brushes or rollers properly after using primer can lead to poor results in future projects. Clean your tools thoroughly with water or the recommended cleaning solution to remove any residual primer.
By avoiding these common mistakes, you can ensure that your primer is applied correctly and provides the best possible foundation for your paint job.
The role of primer in enhancing paint durability and longevity
Primer plays a crucial role in enhancing the durability and longevity of your paint job. By providing a barrier between the paint and the surface, primer helps to prevent peeling, cracking, and fading, ensuring that your paint job looks fresh and beautiful for years to come.
One of the ways primer enhances paint durability is by improving adhesion. Primer creates a strong bond between the paint and the surface, ensuring that the paint doesn’t chip, peel, or crack easily. This is especially important for surfaces that have been previously painted or are made of materials such as wood or metal, which may be more prone to damage.
Primer also helps to seal any imperfections on the surface, such as cracks, holes, or rough patches. By filling in these imperfections, primer creates a smoother and more uniform surface for the paint, resulting in a more professional finish. This also helps to prevent further damage to the surface, ensuring that your paint job stays looking great for longer.
Furthermore, primer enhances the color and vibrancy of the paint. By providing a consistent base coat, primer allows the true color of the paint to shine through and prevents it from being absorbed unevenly by the surface. This ensures that your paint job maintains its true color and prevents fading over time.
Lastly, primer helps to save you time and money in the long run. By providing a barrier between the paint and the surface, primer reduces the number of coats of paint needed to achieve the desired coverage. This not only saves you time but also reduces the amount of paint required for the project. Additionally, primer helps to extend the life of your paint job, reducing the need for frequent touch-ups or repainting.
Final Brush Strokes: The importance of primer in achieving a professional and long-lasting paint job
In conclusion, primer is a crucial step in the house painting process that should not be overlooked. It acts as a base coat, creating a smooth and uniform surface for the paint to adhere to. It helps to seal any imperfections on the surface and ensures that the paint goes on smoothly and evenly.
Using primer offers several benefits, including improved adhesion, enhanced color and durability of the paint, and time and cost savings. By choosing the right primer for your project, applying it properly, and properly preparing the surface, you can achieve a professional-looking finish that will stand the test of time.
So, whether you’re painting a single room or your entire home, invest in a high-quality primer and take the time to apply it properly. The extra effort will be well worth it when you see the flawless and long-lasting results of your paint job. Happy painting!